What is Focal length, Sensor size in photography and why is it matters?

The intention of this article is to dig out the relationships between focal length of the lens and the camera’s sensor sizes and how does the both affects the framing independently.

I have made a simple illustration diagram below, which depicts how does the light enters from the scene to the sensor/film.

Focal Length-Photography-Sensor-Light entryImage a. – Light travelling path inside a lens and camera body from the scene. x is the height of the sensor(part of the camera), b is the focal plane(principal)- this always happens inside the lens, z is height of the frame (photograph’s vertical measurement in landscape mode), y is the focal length which is usually mentioned on the lens.

Focal length(y) is the distance between the sensor (a) and the focal plane (b) where the light rays converge to form a sharp image of an object to the digital sensor.

Now, the frame you see via the viewfinder will change, if you adjust the Focal length which is possible in zoom lenses. The same is not possible in prime lenses since the focal length has been set in the factory itself while manufacturing, in such a way that it cannot be changed. The prime lenses are made purposely for high quality at a lesser price comparatively with a zoom lens in that focal length.

Conversely, it is also possible to change the frame by changing the size of the sensor. But the sensor has been fit inside the camera while manufacturing in the factory itself and it cannot be changed by wish on the field. But you can use two different cameras having different sensor sizes as one may wish.

Now we have understood that, if we change the size of the sensor (x) or the focal length (y), in both the ways the frame will get changed.

The ranges of available lenses in the market with different focal lengths are beyond listing thus I am not getting into that.

Sensor sizesImage b – Scale of the other smaller sensors with respect to the Full frame sensor. The FF sensor size is 36mm × 24 mm. For the sake of understanding, we here discuss about the vertical  measurement(x).

The smaller the sensor sizes, the field of view gets narrower. That is, if “x” gets smaller, “z” also becomes smaller Assuming that the “y” is same in both the cases. Conversely, if “x” gets bigger the field of view (z) also gets wider.

The advantages and disadvantages of choosing which sensors (cameras) have been briefly explained here in my earlier article.

The crop ratio has been established in the industry with reference to the 35mm film sensors. 35mm width sensors are the reference one and the crop factor for those sensors is 1.00. Other sensors are classified by the crop factor with respect to 35mm sensors (1.00).

Crop factor is the ratio of the dimensions of a given sensor’s imaging area compared to the 35mm sensor’s imaging area (full frame sensors in common). If a sensor’s crop factor is more than 1(APS-C sensors), the image area will be less by that ratio. Conversely, if the crop factor of the camera is less than 1(medium format cameras), the image area will be more by that ratio.

For instance, if a camera’s crop ratio is 1.60 and you have mounted 85mm prime lens, what the camera sees is the view of 136mm (85mm × 1.60) not what is written on the lens. If the same 85mm lens been mounted on a medium format camera with 0.50 crop factor, what you will be seeing is 42.5 mm (85mm × 0.50) focal length view.

Sensor sizesImage c – Dimensions of the different sensors fixed in different cameras and the respective crop ratios.

The focal length written on the lens is true, only if it is mounted on 1.00 X crop factor sensors (full frame cameras). If you are mounting it on non-full frame cameras, you should multiply the crop factor of that camera to get the actual focal length.

I hope, I have covered all the necessary topics which are required to understand the focal length, sensor sizes and how does both affects what you see in the viewfinder. Have I missed something? or the article been helpful to you, do drop a comment and let me know.

Cheers & Happy Photographing.

Digital Exposure – Redefined

If you are a person like me who expose based on in-camera exposure meter reading and in-camera histogram than this article is for you. Time to rethink the way we were interpreting in-camera tools. Thanks to Bob DiNatale for his insightful article in The Luminous Landscape. The Exposure To The Right(ETTR) concept was first brought to us by Michael Reichmann in 2003. Even earlier, the correct exposure was meant to be a bell curve on the Histogram.!

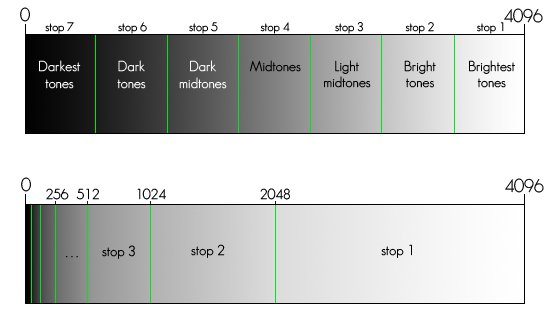
The reason to expose towards right is, the in-camera light meter designed to expose for the mid tones, whereas maximum datas are lying on the rightmost area of the histogram. Have a look at the below diagrams for a better understanding. In general, we might think that camera records the light as it looks in the top portion of the image a. But in reality, the camera records as depicted in the bottom portion of the image a.

ETTRImage – a. The top portion of the image is equally divided stop levels as one may think and bottom portion is how the actual data lies on the histogram.(the image depicts the tonal distribution for a 12 bit RAW image)

Tonal distribution

Image – b. The gray colour highlighted cells are total tonal levels, the respective file can hold. Look at the percentage columns to see the amount of data been hold by the respective stops (the 1st stop is starts from the right most side on the histogram). With relevant to the post, this table is supposed to be the final output from the computer not from the camera. Everything else in the table means the last stops, possibly the 6th & 7th stops together.

Here is the link for the above google spreadsheet with commenting privilege, where one can check the calculations behind the tonal levels and if you wish to share some, do comment there. In few model of Nikon cameras, the user can select whether they want their data to be recorded in 12 bits or 14 bits. Many prosumer and even some professional cameras claim that they record data in 14 bits but they actually deliver 12 bit files only. I wonder if any full frame camera is recording data in 16 bits, but needless to say many medium format cameras do deliver 16 bit images.

Coming back to the objective of the article, Bob meant to say the metering should be done for the brightest area in the scene plus one stop, since the camera meter’s perfect exposure is one stop underexposed than the raw processing softwares.

“An important thing to understand about highlight warnings is that they occur in two places: 1) on the back of your camera – the “Blinkies” and 2) in your software – highlight “Clipping”.

These 2 warnings ARE NOT the same. Although the camera’s High-Alert “blinkies” provide some information, you can only use them as an indication of optimum exposure. The “Blinkies” on the back of your camera occur about 1 stop before the highlight warning in your software – highlight “Clipping”!”

“If the brightest part of your scene has a 90% brightness in your software… Your scene is underexposed by two stops!  Yes, 90% software brightness equals 2-stops under the “Optimum” exposure. If your brightest software value is around 97%, then you have still underexposed your scene by one stop and therefore lost 50% of the available scene data!”

My latest understandings about the digital exposure are below

  1. If you underexpose knowingly or unknowingly even by one stop, you simply lose a staggering amount of 50% of the scene data. You may able to work on it later but you will be bringing in noise and loss of detail as if you have increased ISO while shooting. If you underexpose one stop according to the camera meter than you lose more than 2 stops which is 75% of the scene data.!
  2. Your camera’s light meter is one stop less than your raw processing software. Which means what is perfect exposure for the camera is -1 EV for the raw process software.
  3. If some portion of your photograph is not blinked on the camera’s LCD, you have already lost one stop at least, that is 50% of the data.!
  4. The optimum exposure is not the one which camera delivers, it is your final output from the computer.
  5. As earlier you can use any metering while shooting, but you have to understand how the respective metering gives the output and apply necessary compensations while shooting to get the most data out of the scene.
  6. The blinkie portions shown by the camera has details needs to be recovered by the raw converting softwares.

If you feel there are too much of maths involved here, yes there are, but I thought of learning it. I did had problem with maths when I was studying. It was a nightmare for me when it comes to Maths, I scored as college first in the subject called technical drawing but when it comes to Maths, I was the person who got marks in single digit out of 100!(Laughs…) But here in histogram and exposure, I could easily learn the maths behind it. So you too can learn it easily.

After reading all the refereed articles and if you find something unnatural or doubtful do let me know in comments. Will be happy to dig in further. 🙂

Cheers and Happy Photographing.

Ansel Adams

The most favourite quotes of mine about Photography.

“…how you build a picture, what a picture consists of,

how shapes are related to each other, how spaces are

filled, how the whole thing must have a kind of unity.” – Paul strand.

“There are no rules for good photographs, there are only good photographs”. – Ansel Adams

“The pictures are there, and you just take them.” – Robert capa

Universal language

“It takes a lot of imagination to be a good photographer. You need less imagination to be a painter because you can invent things. But in photography everything is so ordinary; it takes a lot of looking before you learn to see the extraordinary.” – David Bailey

“Always seeing something, never seeing nothing, being photographer.” – Walter de mulder

“Light makes photography. Embrace light. Admire it. Love it. But above all, know light. Know it for all you are worth, and you will know the key to photography.” – George Eastman.


“Every viewer is going to get a different thing. That’s the thing about painting, photography, cinema.” – David Lynch.


“Once photography enters your bloodstream, it is like a disease.” – Anonymous

When I photograph, what I’m really doing is seeking answers to things.” – Wynn Bullock

photoquote

“I went into photography because it seemed like the perfect vehicle for commenting on the madness of today’s existence.” – Robert Mapplethorpe


“Great photography is about depth of feeling, not depth of field.” – Peter Adams


“My life is shaped by the urgent need to wander and observe, and my camera is my passport.” – Steve McCurry

“When I say I want to photograph someone, what it really means is that I’d like to know them. Anyone I know I photograph.” – Annie Leibovitz


“I never have taken a picture I’ve intended. They’re always better or worse.” – Diane Arbus


“The whole point of taking pictures is so that you don’t have to explain things with words.” – Elliott Erwitt


“Essentially what photography is is life lit up.”- Sam Abell

Quotes about Photography

“In photography there is a reality so subtle that it becomes more real than reality.” – Alfred Stieglitz


“Photography is the story I fail to put into words.”- Destin Sparks


“To consult the rules of composition before making a picture is a little like consulting the law of gravitation before going for a walk.” – Edward Weston


“The painter constructs, the photographer discloses.” – Susan Sontag


“In the context of photography , there was a luck.But the luck will come, when the photographer is ready.” – Adithya Zen


“Would you hang it on your wall? Then it’s a good photograph.” ― Leslie Dean Brown


What’s your favourite quote? Post it as comments.

Steve – A living legend.

People who know about Steve McCurry, please do not read further as you might have read this earlier. What you are going to read further is an attempt of myself to understand few of his works, as I highly admire his work. Though there are/were many legends in this world, I admire him because of the following reasons. The first being that he has visited India 82 times so far in his life which eventually made him know about India better than any average Indian.  The second being the no. of photographs he included human elements in his photographs, the percentage is more or almost all of them. After all we are humans, we better perceive things if it is related to any human form.

Most of his photographs are highly evocative, in general his processing is a bit of boosting saturation, tonal curve adjustment to give the slight faded look and careful usage of vignette and most importantly his photographs are around half stop underexposed which are his trademarks. Another important thing is he doesn’t convert his photographs in to Monochromes often, very few images have had this transition. Many of his popular photographs have been discussed in many places and umpteen times, I have selected few of his less discussed photographs, at least relatively. His other interesting work is here in his blog.

Look at the harmony and the perfect balance in this photograph, two humans & two ships, two poles near by the persons & two poles where the net tied, everything is two except the umbrella and the net. Importantly the horizon is not at the dead center and his view point is bit off center, may be in order to not interfering the ships by the poles.. Could have been a late evening and drizzling too, careful selection of high f no, he must have boosted ISO for obvious reasons and the grains too are obvious to support in this photograph. Even if these two persons were motionless this photograph could have been a very good one, but he let some action happening between the persons, so that the viewer expands his thoughts. And most importantly Steve chose not to convert it in to a Monochrome which we often choose to do and give a lot of explanation to that. If you look at it in a layer based visualisation, firstly two persons – the distance between them is little. Second the poles, in relation with the persons it is wider. Next in relation with the poles the ships are slightly wider. Who knows? Steve might have different idea altogether and that is what is all about photography or for that matter any form of art. Isn’t it.?
The Tailor
You might have seen this photograph earlier, but let me tell you why this photograph is important. After this photograph published in National Geographic magazine, the sewing machine company found this old man in India all the way from USA and gave him a new sewing machine.! Have a look at this man, he is under crisis, his home must have been devastated by the floods. But he holds a smile with his toothless mouth (may be Steve cracked a joke!). No wonder Steve categorised this photograph under Universal language.
The boy and the foot ball
Sheer power of simple composition – If the kid stands upright, this photograph would be a normal one. The staircase balustrade line, the staircase slab line and the human body inclined with somewhat parallel to the above two lines makes this photograph an interesting one. The ball above his head is adding value and makes sense to his inclination.
Soldiers
Correlation – The soldiers on the wall painting, people inside the bus. Soldiers have gun in their hand, all those people’s hands are either supporting or holding, in other words all the hands are visible to the viewer. And the two ladies on the wall and the two persons outside the bus. The red colour patch on the wall and the red colour band on the bus.
Few of his other works, which I find difficult to write an insight kind of.
Prayer
Hunger


All of the above photographs has been taken from his website. If you have an opinion/insight about his above works do share in the comments section. I have made an earlier attempt here. An interesting article here about how digital photographers have fetishized sharpness and detail.
Cheers.

Full frame & APS-C sensors why and why not.

Full frame is derived directly from 35mm films. The sensor size is 35mm width as in films.

The advantage of having a full frame is

a)    You have got around 2.5 times more surface area on the sensor than in an APS-C sensor; it means more photo sites in the sensor which directly leads to capturing more details.

b)    By the very nature of the sensor you can shoot up in high ISO without any significant noise.

c)    The lens focal length will shoot what exactly it shows when it is mounted on a full frame sensor. (details below)

d)    You want to take a shot at f 1.8 in a full frame; you get 1.8, but in APS-C you get 2.88 and so on. (details below)

For instance you shoot in 200 mm zoom on a full frame camera you get exactly what it is in 200 mm, but in a APS-C (1.6 crop factor) actually you get 320mm zoom (1.6*200), it could be an advantage of using APS-C for some zoom shots. When you want to take a wide angle shot you actually zoom in a bit. In that case you definitely need a full frame camera and that too, too many details in a wide angle shot, without a doubt you need it.

The shot you take on f 22 in a full frame is not the same when you take the very shot in f 22 in APS-C. To get the shot equivalent to f 22 in FF you have to change the f no. to 14 in APS-C.

Image

Advantages of APS-C sensors

a)    You zoom in according to the extra crop factor, say if the crop factor is 1.6 multiply your focal length by 1.6 (as mentioned above), without any extra zoom lens.

b)    The cost of the APS-C sensor/camera is far less than FF. (Details below)

c)    A very good one for starters.

Why a FF sensor does cost much than an APS-C?

Sensor is made of Silicone wafer with other technical parts in it. The silicon panel comes in a size where APS-C sensors can be cut without much wastage. Whereas lots of wastages in cutting in to FF sensors. So the manufacturers want to make the lost money in wasting the wafers. (I strongly believe they will be recycling the waste portions)

Conclusion

a)    If you are a starter you do not have to buy a FF camera, APS-C is far better for learning.

b)    If you are a wildlife photographer, you buy an APS-C high end camera (say canon 7D) you get 1.6 converter attached to it by its very nature.

c)    If you are high end fashion photographer and your photographs are going to print often, better you own a FF apart from having some L lenses.

d)    If you are a night bird; you have to take a FF camera. APS-C cameras are very bad for lowlight, night photography.

e)    This above list is not exhaustive.

Thanks for reading, If you find useful do comment and share. If you find mistake do notify, will modify it. I do make mistakes.

Navaneethan

To follow my works

https://www.facebook.com/Navansphotography

Colours