What is new in the latest Canon cameras?

As you might have come across about the announcement of two new cameras from Canon, this post is about my take on those cameras.

One being named as Canon EOS 5DS and the other being EOS 5DS R – the one big difference between these two cameras is the 5DS R comes with “Low-pass filter effect cancellation” which must be a good news for Professional Landscape photographers. However, I am writing a separate article about the low-pass filter aka Anti-alias filter.

Both the two cameras are full frame sensors and having high resolution of 50.6 megapixels. First time in the line of Canon EOS cameras, to have this high resolution.

  • The specification of both the cameras states about the Low-pass filter that “Fixed position in front of the image sensor” and in the feature page of 5DS R clearly states that LPF (Low-pass filter) effect cancellation takes full advantage of the original resolving power of the 50.6 effective megapixels CMOS sensor, delivering even higher resolution images” Which makes me wonder Canon might have taken the Nikon’s way as Nikon did it in it’s D800 E. If canon have taken a different method to cancel the filter’s effect, we don’t know, will have to wait for the detailed lab review from the reviewers.
  • The prices for 5DS mentioned as $3699.00 and for 5DS R as $3899.00 for a 50.6 megapixels camera, I would say decently priced.
  • Maximum ISO on both the cameras are 6400 only. Whereas in 5D MKIII one can peak up to ISO 25600. If not all, few will definitely going to turned off by this. The reason behind this is because of bringing in more pixels in the same sensor area. (The pixel unit for 5D MKIII is 6.25μm square and the pixel unit for 5DS is 4.14μm square. The more this no. better spacing,better signal to noise ratio, better image quality, going in depth about this becomes a science class, where I am not that good, I will leave it here itself).
  • Shutter speed remain same as in 5D MKIII, max speed is 1/8000. Possibilities are there for the same shutter as in 5D MKIII.
  • Built in Intervalometer comes in both the models, which will be lauded by the enthusiasts.
  • The 1.3X and 1.6X are the options in processing (in-camera processing). Post capture, the image will be cropped and pushed to the memory cards as the user desires.
  • Advanced mirror control mechanism is definitely going to help minimise shakes in low shutter speed.
  • The Dual DIGIC 6 processors are definitely expected to handle the massive 5 fps data from the sensor.
  • USB 3.0 is as well going to support transferring the images.
  • EOS Scene Detection System features a 150,000-pixel RGB+IR Metering Sensor for excellent precision, this is going to help in nailing perfect exposure.

In a nutshell, ISO performance is going to turn off the professionals, especially event photographers. Many would have expected Wi-fi and in-built GPS, which is not been provided in one model even.

Except the above, I think the other specifications calls for a go around though. I would like to take out this machine for a while.

A small announcement to all my readers – I have transferred all my posts from here to my website under a sub-domain blog.navansphotography.com. For sometime I will be continue posting here.

Head to the site and subscribe to my blog by typing your mail id in the right side bottom corner box to receive my posts, product notifications and offers to your inbox straightly. Being our esteemed subscribers, you will be in our priority list to get to know about our upcoming stuffs related to photography – be it an e-book or trip or even photo walk. We assure you that you won’t get more than one mail per week from us at the maximum; that’s our promise. We don’t sell your mail id as we respect you and your privacy as ours. 

This is how we trekked Pushpagiri hills aka KumaraParvatha.

I was all set on Day 1 to meet up in front of Hotel Hablis at Guindy.  It was Thursday, Jan 22nd, 2015 and we had planned to reach Kukke by car, we were totally 8 people in 2 cars. 8:30 PM was the meet up time, Arun had come home to pick me  and drop me at the meeting point. Since it was a long time that we had met and Arun not being part of the trip thought of catching up with everyone.

Reddy garu taking selfie.

Reddy garu taking selfie.

Arun & myself reached Guindy at 8:35 PM, while Allwyn called me up and told that he is just starting and will reach by 9:00PM. Rajnikanth(read as Ravikanth), Johnny, Shyam, Reddy garu and Allwyn finally  came in another  20-25 minutes, except for Bala. We called up Bala (who resides just 5 minutes away from the meeting point) who had caught up with something. Finally, he also reached the spot with all the food items packed for the trek. Bala’s whole family was involved in making the chapatis, packing it and few things were bought-out. Arun had to leave early as the next day was a special occasion (will discuss about this later) and Chandru could not join as well as he had few new clients visiting him. The journey started finally.

Myself and Arun had awesome chapatis with vegetable curry at my place. Enroute we had to pick Saravanar (read as Saravanan) at Ramapuram. After picking him up, we travelled searching for a restaurant, the same Dhaba that we had dinner in our earlier trip to Sharavathi. After crossing Sriperumbudur, you find a HP fuel pump where the Punjabi Dhaba is situated with a super awesome recessed parking from the highway. In the joy of dining the same Dhaba we gave our usual order of Mutton, Chicken, Kadai curry and  almost all the available non-veg curries there. Since I had awesome food at home, I limited myself with 2 rotis and we all winded up from there.

All our chit chats started, I was in Bala’s car so that we could share driving during the long distance. This time it was 700 km’s one way. One by one people slept songs, chit chats, toll booths, after couple of hours tea break everything was part of our trip. Since Chandru was not in this trip, Shyam took up the role of accountant(actually forced to).

Our plan was to reach Bhat’s house for the Day-2 night stay. The Bhat’s place itself needs to be trekked for around 5 Kms from Kukke. We reached Mysore by early morning, since the route to Kukke from Hassan was blocked, we had to take up the Mysore, Madikeri route. After the breakfast, few humpy bumpy roads, detours and with comfort breaks we reached Kukke by 2:00 PM. Had food first, searched a place to park our vehicles, in order to make a safe place we booked a room for Day 3 night’s stay and we parked our vehicles there in the hotel. None of us had taken a bath post the 700kms journey and it was appearing on everyone’s faces. Each of us were smelling with sweat.

Running fox

Running fox , if you are lucky you can see it. 😉 PC – Ravi’s Mobile phone.

Backpacks loaded, finally we set off for the trek. As we started trekking, it was a bit tiring to everyone, our heartbeats were so loud that the nearby person could hear that. Maybe because we were trekking after a long break.With breaks, we proceeded with a bit of difficulty, honestly. The day’s dawn gone and slowly the night invited us. When the darkness was about to cover Ravi saw two foxes running by, he took pictures with his mobile phone. As we trekked up with our torches in hand we were unable to find the Bhat’s house as mentioned in the blogs, none of us had been there earlier too. But all other signs were there – the big rock and the forest department’s board according to this blog. In Pitch dark, stars were awesome with the crescent. Everyone was tired significantly, especially those who drove overnight.

A small decision came up to spread the tarpaulin right there and sleep as we had water, food, sleeping bags almost all the emergency things. The one big problem we found was to attend to the nature’s call (excretion). Since we were all travelling we did not stop for that particular task, the carbon dioxides started polluting the environment. This time Allwyn came up with full preparations, a big wet wipe pouch. I grabbed it from him and went into the dark to attend to my nature’s call, the foxes were jumping in my minds though, kind of distracting, you know. 😉

We stood in the middle of the jungle with no direction to proceed further, one thing we knew was we were close to the Bhat’s house, we started shouting repeatedly but there was no response. I asked Saravanan to blow the whistle as he use to carry, he searched all over in his bag and waved off his hands. I always felt that he is kinda jungle man who loves nature and that is also one of the reason we were there. Ravi started whistling with his finger’s help. No response. But Bala’s ears were a bit powerful, he said some noises are coming from the west, who know where is west.! As Saravanan is interested in exploring he went towards that direction around 20 steps and shouted, but no response. To add on there was no mobile network.

We all were stranded in middle of the forest around 8:30 PM, finally something happened and we found the Bhat’s house, as you could imagine it was very close to us may be within 100 meters, but it was bit down hill. We walked down towards the kind of small valley. Once we reached, we introduced ourselves to Bhat and requested him for dinner. We had called him from Kukke and let him know that we were coming, Bala had a phone which works inside the forests. 😉

At Bhat’s house, there were already people from Bangalore, probably from a college, girls and boys who were enjoying their time. Finally, we had rice and sambar as our dinner and hit the sacks quickly. The plan was to wake up early morning and reach the peak by noon and reach back the base (kukke) by late evening so that we will have two more days to explore the nearby places.

Day : 3 – We woke up early morning, done with our morning rituals(hei, it was pending for 2 days). It was cold but bearable though in the morning. As the day proceeded the sun was burning on us. Enroute we had chapatti as our breakfast with variety of pickles. We trekked further towards the peak, as we proceeded there was no water and we saw people who trekked from other side of the peak, from Somwarpet. We trekked and reached the peak where we had some awesome views. All the way Reddy assumed himself as a model and posed for pics crazily to all of our cameras. Ravi was the one who clicked many pics of himself and the team as well. We started back, while we saw many youngsters heading to the peak, probably from a college or from an IT company. Few were wearing jeans and I assumed they might be having their first trek!!

During a Break.

During a Break.  PC – Ravikanth Kurma

As we reached back to Bhat’s house it was 6:00 PM, where we had a quick break, filled our water bottles and started heading down. The day was a packed one. As we headed down, Johnny had a small injury. Saravanan helped him find a piece of timber, that could be used while descending, much helpful. Allwyn had a sweet emergency back home, received message while climbing itself. He needs to go home which was 700 kms away. Bala said ‘I would love if I go and have rest lying on the bed whole day at home.’ With all this things in head, we trekked down from Bhat’s house, it was draining. Another 5 kms trekking, we would reach the base and there was a room with comfortable bed waiting for us. But every step was painful, I had sufficient, actually more breaks in order to get myself down properly. Johnny sweared on the big rock not to take any break till he reached the base and he did follow it. As I was the one who reached the base first, I slept on the road itself till everyone reached.

The time was 10:30 PM, we went to the hotel room and 3 in the group stayed at room. Remaining 5 went for food, the hotels were still open. We filled our stomach with dangerously mixing the food items and had some parcelled for the team mates back in the room. The plan was to visit the temple next day morning and head back home. Way back if anything worthy of visiting, will do. Totally we trekked an altitude of 1400 mts and 26 kms.

Day :4- We started from Kukke around 12 noon, had a leisure day, kind of at least. Enough food for breakfast, we skipped lunch needless to say. We were heading to Dubare Elephant camp, visited Elephants and the girls over there at Thala cauvery for the holidays. Bala had a fashion shoot there 😉 Spent enough time and started from there with the intention of reaching Chennai by Day-5 morning. It became evening and we had stopped by in a bakery to fill the stomach. We thought of having momos, but no reliable info, so we stopped by a bakery.

Reached Mysore and we were about to take the highway to Bangalore while it was time for dinner. Peeked out our sights for a promising hotel, Saravanan said that last week he was here and nothing was good. We skipped around 4-5 restaurants and we have no intention of taking the highway without dinner. Suddenly there was a board that read as “Poojari’s seafood Hotel” Johnny shouted from the back, this restaurant serves good food and that he had been their earlier.  We all headed inside, almost bulk orders, started with clear crab soup, and the list goes on with prawn curry, prawn tandoori, Neer dosa, Butter chicken masala, Mutton gravy, Chicken ginger no idea where we finished the order. Somehow we had completed dinner and paid the bill(this bill alone was 15 % of the whole trip’s expenses). Final touch with a sweet beeda.

Started driving and reached Chennai by 6:00 AM on Day 5. I gave back the wet wipe pack back to Allwyn. Allwyn’s sister had given birth to a beautiful baby, Allwyn became an uncle. He rushed back  home and pacified the family members with much less effort not as he feared. Bala went with the intention of buying country chicken for lunch, the whole day reserved for rest. By the way Arun has his engagement on Day 2.

Later Allwyn told us that he went straight to the hospital and coincidentally his sister was getting discharged from the hospital, he brought her back home and hit the bed at 2:00 PM, woke up for dinner at 10:00 PM, had hot dosas by his mom, hit back the bed and woke up next morning. 16 hours of sleep almost non-stop. It was another wonderful team trekking to cherish.

Many more happy trips and trekking experiences to follow 🙂

What is Focal length, Sensor size in photography and why is it matters?

The intention of this article is to dig out the relationships between focal length of the lens and the camera’s sensor sizes and how does the both affects the framing independently.

I have made a simple illustration diagram below, which depicts how does the light enters from the scene to the sensor/film.

Focal Length-Photography-Sensor-Light entryImage a. – Light travelling path inside a lens and camera body from the scene. x is the height of the sensor(part of the camera), b is the focal plane(principal)- this always happens inside the lens, z is height of the frame (photograph’s vertical measurement in landscape mode), y is the focal length which is usually mentioned on the lens.

Focal length(y) is the distance between the sensor (a) and the focal plane (b) where the light rays converge to form a sharp image of an object to the digital sensor.

Now, the frame you see via the viewfinder will change, if you adjust the Focal length which is possible in zoom lenses. The same is not possible in prime lenses since the focal length has been set in the factory itself while manufacturing, in such a way that it cannot be changed. The prime lenses are made purposely for high quality at a lesser price comparatively with a zoom lens in that focal length.

Conversely, it is also possible to change the frame by changing the size of the sensor. But the sensor has been fit inside the camera while manufacturing in the factory itself and it cannot be changed by wish on the field. But you can use two different cameras having different sensor sizes as one may wish.

Now we have understood that, if we change the size of the sensor (x) or the focal length (y), in both the ways the frame will get changed.

The ranges of available lenses in the market with different focal lengths are beyond listing thus I am not getting into that.

Sensor sizesImage b – Scale of the other smaller sensors with respect to the Full frame sensor. The FF sensor size is 36mm × 24 mm. For the sake of understanding, we here discuss about the vertical  measurement(x).

The smaller the sensor sizes, the field of view gets narrower. That is, if “x” gets smaller, “z” also becomes smaller Assuming that the “y” is same in both the cases. Conversely, if “x” gets bigger the field of view (z) also gets wider.

The advantages and disadvantages of choosing which sensors (cameras) have been briefly explained here in my earlier article.

The crop ratio has been established in the industry with reference to the 35mm film sensors. 35mm width sensors are the reference one and the crop factor for those sensors is 1.00. Other sensors are classified by the crop factor with respect to 35mm sensors (1.00).

Crop factor is the ratio of the dimensions of a given sensor’s imaging area compared to the 35mm sensor’s imaging area (full frame sensors in common). If a sensor’s crop factor is more than 1(APS-C sensors), the image area will be less by that ratio. Conversely, if the crop factor of the camera is less than 1(medium format cameras), the image area will be more by that ratio.

For instance, if a camera’s crop ratio is 1.60 and you have mounted 85mm prime lens, what the camera sees is the view of 136mm (85mm × 1.60) not what is written on the lens. If the same 85mm lens been mounted on a medium format camera with 0.50 crop factor, what you will be seeing is 42.5 mm (85mm × 0.50) focal length view.

Sensor sizesImage c – Dimensions of the different sensors fixed in different cameras and the respective crop ratios.

The focal length written on the lens is true, only if it is mounted on 1.00 X crop factor sensors (full frame cameras). If you are mounting it on non-full frame cameras, you should multiply the crop factor of that camera to get the actual focal length.

I hope, I have covered all the necessary topics which are required to understand the focal length, sensor sizes and how does both affects what you see in the viewfinder. Have I missed something? or the article been helpful to you, do drop a comment and let me know.

Cheers & Happy Photographing.

Powerful toolbar in Lightroom for sorting all of your photographs.

Can you guess what that would be? When Lightroom was designed in the initial stages, it was not meant for image developing, though it does the developing part now far better than necessary for a photographer. It is meant for the Image management, which is the library part kept in mind while developing. Now I hope you got a close guess in finding out the most powerful toolbar in Lightroom. The toolbar in the library module, which can be made visible by pressing “T”, pressing again will make it hidden and vice versa. Let’s look into this toolbar in detail in this post.

Powerful toolbar in Lightroom-1 Grid viewImage – 1: The above view is the complete appearance of the toolbar from Library module in grid view.

The main purpose of this toolbar is to help you organize your 10’s of 1000’s of images and it does the job well. If you know the tools, you will be in a better position to make use of it. The first tool from leftmost is the grid view tool; you can also press ‘G’ to enable this grid tool(this is the default view of Library module). This tool is nothing but to see all your images in that particular folder or collection or for that matter a whole year’s folders or your complete catalog even.

Loupe view(E)

To view/inspect one image at once, pressing “E” will make the selected photograph to occupy the workspace. From here, you can rate your image, sort based on colour, flagging.  The key difference here is once you go to the Loupe view, the painter tool will go off (you don’t need it in Loupe view) and Zoom & Grid tool starts appearing in the same tool bar. Zoom tool is to view your image in 1:1 ratio or you can set the amount of zoom. Grid tool will enable you to activate grid overlay on your image, with the help of grid overlay you can inspect the horizon or verticality of the image closely.

Powerful Toolbar in Lightroom Loupe view-2

Image -2: The above is the complete appearance of the toolbar from Library module in loupe view.

Tip: Pressing enter from grid view will take the most selected image to Loupe view, pressing esc from Loupe view will take you back to grid view.

Compare tool (C)

After selecting any two images from gridview and hit “C” will enable this tool putting both the images in side by side in order to compare as the name goes. The most selected image (select Image) on your left and the next image (Candidate image) on the right side by side. Both the photographs will be displayed with their star, flag and colour ratings if any, you have applied earlier. Clicking the cross mark on the bottom of the image will deselect the photograph respectively.

Pressing the lock symbol on the toolbar will lock the zoom function, so both the photograph can be zoomed equally at once. If you have zoomed in the image independently, press the sync button to bring back the other image to tandem. Pressing the XY button will swap the Candidate and select images.  Clicking the next XY button will make the Candidate image become Select image.

Powerful Toolbar in Lightroom Survey view-3

Image-3: Screenshot of compare view

The arrow marks will navigate through the folder or collections which you have selected. The Select stays the same and the candidate image changes. Clicking done will take you to the Loupe view with select image.

Tip: Selecting more than two images before pressing “C” will enable you to compare two at a time within the selected images.

Survey Tool(N)

The next tool in the main toolbar is Survey tool. To compare more than 2 images on a single window, survey tool will help. The most selected image will have a white border; you can apply the ratings, flag status, colour ratings. This tool will help in selecting that one particular shot from the range of shots made in burst mode while shooting.

Powerful toolbar in Lightroom-Survey view-4

Image – 4: Screenshot of Survey tool

As you press the left and right arrow marks, the selection will go through only with the selected images in grid view, not with the whole selected folder/collection. The selected image will display a cross mark on the right bottom. If you click that, it will remove that particular image from the survey mode.

Note: The difference between Compare and Survey tool is, Compare tool will let you compare only two images at a time, but in survey mode you can compare many images at once.

Tip: Press tab to hide both the right and left side panels to provide more workspace.

Painter tool (Ctrl+Alt+K)

The painter tool is the one which looks like a paint can, the fifth tool displayed in the toolbar. This is one of the very helpful tools in classifying your photographs. The purpose of this tool is to apply specifically to particular images a Keyword, Label, Flag, Rating, Metadata, Settings, Rotation, Target collection (attributes).

The most Powerful toolbar in Lightroom-Painter tool-5

Image-5a: The painter tool between the survey sign and sort order (encircled in red)

The most powerful toolbar in Lightroom-Painter tool

Image-5b: Once you click the painter tool the cursor will change into a spray paint can and you have to spray the parameters (click) you have selected onto the images you wish.

Once the painter tool is activated, the cursor will turn into a spray paint can and you can apply any one of the 8 attributes at a time displayed in the screenshot below.

Adobe Photoshop Lightroom - Library Painter options

Image-6: Painter tool options

If you decided to apply a keyword (e.g. – Monochrome) to few of the photographs/collection, you can do so by typing the text on the field which will appear immediately you select “keywords” from the drop-down menu next to the painter tool. After that, you only need to click on the thumbnails of the photographs which need the keyword to be applied. By the very same way, you can apply Colour label, Flag status, Star ratings, Metadata, Settings, Rotation and target collection.

Sort order

The sort order tool will help you make a visual search of a particular photo from the folder/collection based on the name, edited time, added order etc. as displayed in the screenshot below.

Lightroom-Sort order

Image-7: Sort order options

This is another interesting tool available in Library module. As you see the screenshot, you have got many options to sort the photographs to select the photograph which you wish to.

Flag tool

The easiest way, to use this tool is to use the keyboard. Navigate the photographs through arrow keys and press “X” to set reject mark and press “P” to mark the photograph as selected. Pressing “U” will remove any flag marks from the photograph.

Star Rating

The star rating tool is easy to use via numeric keyboard. Press 1 to apply one star and press 5 to apply five star rating, zero to remove any star rating from the photograph. Simple tool but very helpful in classifying your photographs.

Tip: To reduce the star rating (for example 4 to 3) press [ square bracket. If you want to increase the rating, you can press ].

Colour Labels

You can have your own set of meaning to the colour labels as it does not come with any meaning by default. To set the colour labels, press 6, 7, 8 & 9 for Red, Yellow, Green, Blue respectively and Purple cannot be applied via any numbers/shortcuts.

Rotate buttons

This tool is also a straightforward tool. To see your portrait photographs in vertical mode (as it is supposed to be) this tool will come into use. To turn the photograph Counter Clockwise (Rotate left), you need to press the first button or the shortcut to do this is Ctrl+[.  To turn the photograph Clockwise, you can press the next rotate button or use the shortcut Ctrl +].

Tip – If you have set the display mode in camera itself, Lightroom will automatically do this.

Navigate buttons

This tool will do the same function as if you pressed the left & right arrow keys on your keyboard to navigate through the present folder/collection.

Play button

Clicking this tool will enable an Impromptu Slideshow with the photographs in the folder/collection. As you might expect, the slideshow will take up the whole screen to play the slideshow. Will come in handy when you have made a collection of final processed photographs from a shoot for client’s review.

Thumbnails

Drag this tool to your right-hand side to make the thumbnails bigger and drag it to left-hand side to make the thumbnail smaller. Alternatively you can press “+” symbol key to make the thumbnails bigger and “-” symbol key to make the thumbnails smaller.

Inverted triangle

This tool will enable you to select which tools you wish to be displayed on the toolbar; you can deselect few tools if you don’t want to see them on your toolbar.

Adobe Photoshop Lightroom-Library

Image-8: Customisations of the tools you want to see on the toolbar.

Tip: In Loupe view, the Opacity and the density of the grid lines can be changed by holding the Ctrl key, when the Grid is activated. You can increase/decrease the size of the grid and reduce/increase the opacity of the lines by mouse.

Library Toolbar in Lightroom

Image-9: Screenshot showing the image in Loupe view and Ctrl key Pressed & hold down to display the options. The options are marked in red colour.

This toolbar and all the tools on it are the ones which will help the photographer to sort, classify, select, order the 10’s of 1000’s of photographs into a proper understandable way, so that any point in future, he/she can get the photographs in no time from his/her Library. And that’s the reason I have said it as a most powerful toolbar in Lightroom.

Have I missed something here or do you think some other toolbar is much more powerful than the one we saw above? If so, put it in comments and let me know. Does this article helped you? do let me know in comments.

Cheers & Happy Photographing.

Subscribe to our blog by typing your mail id in the box below to receive our product notifications and offers on the same. Being our esteemed subscribers, you will be in our priority list to get to know about our upcoming stuffs related to photography – be it an e-book or trip or even photo walk. We ensure that you won’t get more than a single mail per week from us at the max; that’s our promise. We don’t sell your mail id as we respect you and your privacy as ours. 

Thanks for visiting. 

Fooggy Chennai

It’s really a cool Annual report by WordPress – Year 2014 review.

Here’s an excerpt:

A New York City subway train holds 1,200 people. This blog was viewed about 6,800 times in 2014. If it were a NYC subway train, it would take about 6 trips to carry that many people.

Click here to see the complete report.

Hello Dear Readers,

Have you clicked the above link for the full report? If not please do that and proceed further.

If you are reading this, than I think I have served something helpful to you in my earlier posts -Thanks for hanging around with me. If you havenot been earlier here and you are reading this Welcome aboard. This year will meet you with more posts.

Last year happened to be 20 posts, and 2 blank months – bad isn’t it? Not well planned though. This year will maintain 4 posts per month (minimum one per month and maximum nos. to maintain 54 posts in the year).

My very first post had got the most no. of hits last year. “The busiest day of the year was March 4th with 376 views” It is really awesome, you know.! Your very first post holds the most views. I am glad and the meaning of this blog is started appearing.

Stop – Have I told you what is my next post? “The most powerful toolbar in Lightroom”

Cheers and great Going Navanee – It’s to me this time. 😉

Colour spaces

Colour spaces in photography – An Introduction

In a simpler definition – A very defined space where exactly this many colours can be displayed/shown, by the device. In other words it is to determine one device’s ability to display the no. of the unique colours (sometimes a part of the device). Be it a computer screen, a mobile phone’s screen, or a tablet’s screen, most of the times it is hardware but in few cases, it is software (for instance – a browser).

sRGB – a colour space jointly created by HP and Microsoft. This profile is the most widely used one for browsers and most of the screens including tablet screens and mobile phone screens. As the below diagram depicts, the largest colour profile next to visually perceivable is ProPhoto RGB, the next smaller one is Adobe RGB and the smallest one is sRGB.

Since sRGB is the most used colour space in the browsers and alike in displays, you are expected to export your images in this colour space, so that the colour you have seen while editing are better displayed by the same file in the other mediums or displays.

Note: Not all the monitors available in the market possess the ability to display all the colours in sRGB. They usually measure it in percentage, for example – 75% of sRGB, 90% of sRGB. If you are a professional you might consider buying a monitor which covers a higher percentage of sRGB, mostly 90% + or even 90% + of Adobe RGB colour space. Dell ultra sharp series monitors have a positive feedback  in general.

A monk at Bylakuppe

Adobe RGB – as the name suggests created by Adobe systems and is smaller than ProPhoto RGB but larger than sRGB. Widely printers are using this profile, but it is advisable to check with the printing service provider before sending the files, in which colour space they need. Adobe RGB includes 50% of the colours specified by Lab Colour space.

Many printers and almost all commercial places most likely need the files in this colour space.

ProPhoto RGB – made by Apple, the largest colour profile available, but no devices support this profile yet. Hence if you export your file in this profile, the display medium will convert the file’s colour space into the device’s colour space in a best possible way! and it may show drastic colour differences. ProPhoto RGB includes 90% of all perceivable colours specified by Lab colour space. Currently there are no devices which support this profile. In future, there may.

Note: When you photograph, if you are shooting in RAW mode, you don’t have to worry about which color space to be selected in your camera, because RAW files are only interpreted by the softwares, basically the RAW files contains the data – it is not even a image format. But if you are shooting in jpeg, your color space selection does play an important role. Set Adobe RGB, if the purpose is to send photographs for print. If it is only for web services and display purposes, sRGB is sufficient.

Colorspaces explained

Colour spaces visually explained.  Image source – Wikipedia.

All the colour spaces are displayed over the visible colour space to have a better understanding.

If you are using Lightroom to edit your photographs, you do not have to worry about color space as Lightroom is working on the largest colour space ProPhoto RGB. The only place where you have to decide is when you are exporting your file from Lightroom.

Note: When exporting you can apply any of the above colour spaces to your photograph, the thing matters is the purpose of the photograph.


Hope I have made the basic understandings of the colour spaces currently being used. If you have got to say something about colours, comment it. Will be looking forward to it.


Cheers & Happy Photographing.


photo blog blog
photo blog blog

Contests

Photography Contests – What a participant is expecting?

As a participant – a photography contest is expected to be a fairly judged place where the very same act must enable all the participants (including the winners) to excel further in their chosen hobby/passion/profession.

But in the recent contest I have participated, I have been selected for portfolio review (supposed to be the pre-final level) where they were supposed to look at the best images from all the participants. The judging panel consists of two local photographers who happened to be photographing for long time (decades!). The reason is that they are holding some senior positions in a local photography community or they are senior photographers! The chief judge is the highlight of the judging panel, he is a technical consultant for that optics company. He is a technically loaded person, he can talk about anything from white balance, sensors, pixels, RGB values, Colours, Colour theory, CMYK, Printing nuances, anything inside the camera and anything on the photograph technically. The other side of this gentleman is he take/took no decent photograph.

Even if he (or for that matter the whole judging panel) would have shot excellent photographs, it was not anywhere in the public medium, not in social media, not in any websites, nowhere.  It is better if the judges were known proven photographers so that the meaning for the contest is intact. If a contest has been conducted as ritual formalities, there is no point in it.

The whole day review was a nightmare, where every photograph from all the participants were analysed/checked for technical qualities, tonal values, checked with the crop tool (I do agree with the crop tool that it is a second opportunity to recompose your decent photograph, check this article I have wrote a year back!) and checked for horizon tilt (If there was a blunder, it should not have been selected in the earlier round itself). They also talked about Histogram, ETTR, colour spaces etc., all technicals. Portfolio reviews are not supposed to discuss about crop, horizon tool. These tools were supposed to be discussed at an amateur level and less than that. It is a place where a good photograph should be selected which could easily be agreed by almost all of the participants. No participant comes with a mindset that his/her’s is the best work. But all the participants needs to be convinced that the selected photograph is better than his/her’s.

I have following questions pertain to the contest.

  1. Why the contests have been highly aligned towards technical stuffs? This photographical world is already been dodged with lots of technical stuffs. Why a contest needs to be aligned in that way?
  2. Why the judging panel is not having a decent/known photographer? Or the contest is not been intended to bring out the talented people out there? The objective is not clear or it is just a formality.
  3. If a contest been conducted in a fair manner, why the judges profile have not been revealed? – if he/she is not much known to the outer world.


In an other earlier event organised by Behance, few photographs of mine were chosen by the judging panel, taken printout and the hardcopies were about to be reviewed by “Yannick cormier”. Yannick did reviewed, but unfortunately for that particular event, I was not able to participate. I had made some earlier commitments on those dates and I was unable to dodge those commitments or postpone them. I literally missed an opportunity to meet the great photographer.

Honestly speaking, this article is not meant to hurt anyone or to offend anyone. The only intention is to make better competitions, healthy discussions, cultivate better talents and teach people. Make the competition healthier, hygienic – a more better planet to live altogether.

Finally a fair and nice article about participating in photographic competitions.

A quick update here

There was one gentle man in the judging panel, during my portfolio review he said – This photograph is an excellent composition. I don’t know whether this words have been heard by the chief judge! but just wanted to put it in this post that he did talked about composition and photography. Atleast one man was there to talk about photography.

Digital Exposure – Redefined

If you are a person like me who expose based on in-camera exposure meter reading and in-camera histogram than this article is for you. Time to rethink the way we were interpreting in-camera tools. Thanks to Bob DiNatale for his insightful article in The Luminous Landscape. The Exposure To The Right(ETTR) concept was first brought to us by Michael Reichmann in 2003. Even earlier, the correct exposure was meant to be a bell curve on the Histogram.!

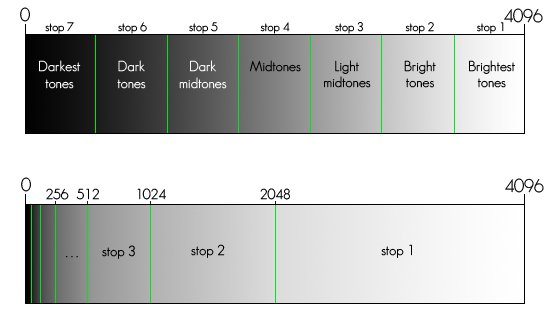
The reason to expose towards right is, the in-camera light meter designed to expose for the mid tones, whereas maximum datas are lying on the rightmost area of the histogram. Have a look at the below diagrams for a better understanding. In general, we might think that camera records the light as it looks in the top portion of the image a. But in reality, the camera records as depicted in the bottom portion of the image a.

ETTRImage – a. The top portion of the image is equally divided stop levels as one may think and bottom portion is how the actual data lies on the histogram.(the image depicts the tonal distribution for a 12 bit RAW image)

Tonal distribution

Image – b. The gray colour highlighted cells are total tonal levels, the respective file can hold. Look at the percentage columns to see the amount of data been hold by the respective stops (the 1st stop is starts from the right most side on the histogram). With relevant to the post, this table is supposed to be the final output from the computer not from the camera. Everything else in the table means the last stops, possibly the 6th & 7th stops together.

Here is the link for the above google spreadsheet with commenting privilege, where one can check the calculations behind the tonal levels and if you wish to share some, do comment there. In few model of Nikon cameras, the user can select whether they want their data to be recorded in 12 bits or 14 bits. Many prosumer and even some professional cameras claim that they record data in 14 bits but they actually deliver 12 bit files only. I wonder if any full frame camera is recording data in 16 bits, but needless to say many medium format cameras do deliver 16 bit images.

Coming back to the objective of the article, Bob meant to say the metering should be done for the brightest area in the scene plus one stop, since the camera meter’s perfect exposure is one stop underexposed than the raw processing softwares.

“An important thing to understand about highlight warnings is that they occur in two places: 1) on the back of your camera – the “Blinkies” and 2) in your software – highlight “Clipping”.

These 2 warnings ARE NOT the same. Although the camera’s High-Alert “blinkies” provide some information, you can only use them as an indication of optimum exposure. The “Blinkies” on the back of your camera occur about 1 stop before the highlight warning in your software – highlight “Clipping”!”

“If the brightest part of your scene has a 90% brightness in your software… Your scene is underexposed by two stops!  Yes, 90% software brightness equals 2-stops under the “Optimum” exposure. If your brightest software value is around 97%, then you have still underexposed your scene by one stop and therefore lost 50% of the available scene data!”

My latest understandings about the digital exposure are below

  1. If you underexpose knowingly or unknowingly even by one stop, you simply lose a staggering amount of 50% of the scene data. You may able to work on it later but you will be bringing in noise and loss of detail as if you have increased ISO while shooting. If you underexpose one stop according to the camera meter than you lose more than 2 stops which is 75% of the scene data.!
  2. Your camera’s light meter is one stop less than your raw processing software. Which means what is perfect exposure for the camera is -1 EV for the raw process software.
  3. If some portion of your photograph is not blinked on the camera’s LCD, you have already lost one stop at least, that is 50% of the data.!
  4. The optimum exposure is not the one which camera delivers, it is your final output from the computer.
  5. As earlier you can use any metering while shooting, but you have to understand how the respective metering gives the output and apply necessary compensations while shooting to get the most data out of the scene.
  6. The blinkie portions shown by the camera has details needs to be recovered by the raw converting softwares.

If you feel there are too much of maths involved here, yes there are, but I thought of learning it. I did had problem with maths when I was studying. It was a nightmare for me when it comes to Maths, I scored as college first in the subject called technical drawing but when it comes to Maths, I was the person who got marks in single digit out of 100!(Laughs…) But here in histogram and exposure, I could easily learn the maths behind it. So you too can learn it easily.

After reading all the refereed articles and if you find something unnatural or doubtful do let me know in comments. Will be happy to dig in further. 🙂

Cheers and Happy Photographing.

Navansphotography

My never ending affair with food.

Image courtesy – thrillophilia.com

Last week I had an opportunity of travelling 600 Kms North of Chennai to Tuticorin and 600 Kms south of Chennai to Vijayawada. While returning from Tuticorin I was at home (Chennai) for some 8 hours, mostly sleeping.

In Tuticorin, we stayed at GRT and had breakfast there once. It was decent and rest of the times, we had food in the wedding resort itself.

The reason for this post is about a street food shop in Guntur. Yes, the Wedding was at Guntur and the reception was at Vijayawada. We stayed in a guest house in Guntur provided by the client. This time my friends with whom I was travelling, surprisingly had least interest towards food!

The shoot starts at afternoon, we reached Guntur previous day late night. Both of my friends were sleeping like a log when I woke up around 7 am. I brushed and freshen up, went out on the streets of Guntur, had tea and came back. Nothing changed, they remain logs.! Took my smartphone and spend some time in the whatsapp, Telegram, Mails.

After an hour, I went out for breakfast. The area we stayed is called Brindavan nagar and there was a HP fuel pump nearby. I walked past the fuel pump and saw a small street food vendor serving food. It was inviting. The size of the shop was not more than 6′ *6′!  But there were many dishes – Idli, Dosa items, Big poori, Tea etc.

I went in to have a look inside, felt good. I ordered a plate of Idli. They served 3 idlis on a dry leaf with a piece of newspaper beneath it. The idlis were so soft, tender, served hot with a semi solid peanut chutney. It was really yummy, tasty and I thought of getting more idlis, but I went in to the shop because of the big pooris. Now thought of asking poori, but the dosa they serving was much inviting. So I asked a masala dosa.

He spread the batter so nicely to get a perfect round shape, spreaded oil, waited for sometime, put some potato masala on it, spreaded some chutney over the masala, spreaded some red chilli powder on it and mixed all the three. It became kind of jelly like thing, now he rolled the dosa and placed it on my leaf. It was bit hot but bearable. The dosa colour was golden brown and was mouth watering. I started tasting it like, as if I was the king for that region. It was so nice but my intention is to try poori.

My stomach send me the warning signal, and I have no intention to override. I did not ordered poori but asked a cup of tea instead. Enjoyed the tea, paid the bill 45 rupees, went to the room and they were sleeping still.!

Affairs will be continued…;-)

Handicap is just a word.

Don’t do what you do not like – Period

Why one need to do what they cannot hold upon? In my case, it is photography. The answer is really simple. You don’t know what you are really capable of unless you try doing it. But your instincts or inner gut have somehow already know it.

Life Quote

Last week, I have attended one of my friend’s wedding. She is friendly, well matured and a good communicator. When I was working, we both were working together in a project where she would be able to make friends wherever she just walks in. But to me, it was her the only one friend. During that time, I was losing interest in the project and the work itself  for many reasons –  one reason was my immediate superior being a highly incompetent person. It was a sin to work under an incompetent person. Despite having many personal reasons to continue my work there, I started thinking about pursuing photography which I am doing it often then and now. And it was a call from my heart  – I should mention it here, some gut feeling, often my mind stays in photography.


I placed my resignation letter, the formalities were completed and I started pursuing photography as I wished. Similar to any startups or any creative person’s initial days, I have also faced turbulence in running it for living. Now have extended my photography to all commercial avenues, including candid Weddings, Industrial shoots, Facilities, Fashion, Fine art and I have also started conducting Photography workshops, Lightroom workshops etc. Now planning to open my own studio soon, waiting for the funds to flow in. More importantly, I can fix a routine to my work.


Now coming back to the friend’s wedding, I met another friend who was working on the other project then. She was interested in music & singing and had performed on stages at small level. Her mind was always in music, not in the excel sheets. In the wedding she came to me and said – “I also quit my job, got a scholarship in music course, going to full time music class to upgrade myself and you are the inspiration for me to quit my job”. I felt like I had no words to say anything to her. As it was a wedding hall, I kept myself quite with all my energies, and just said “All the very best for your future”. Though I had not achieved much except few wonderful photographs and really worth friends,  I am not doing what I do not like. I think not doing what you do not like is more important than doing what you like to do. Because you might not have come across the thing which might blow your head yet, so stop doing what you don’t like. Start exploring. After all, it’s your life. 🙂

When I was driving back home, I told my wife “I have inspired one and I am proud of it”.